FULLTEXT: PDF HTML REFERENCE: BibTeX EndNote
DOI: 10.1007/978-3-642-03364-3_49
AdMoVeo: A Robotic
Platform
for Teaching Creative Programming to Designers
Department of Industrial Design
Eindhoven University of Technology
5600MB Eindhoven, The Netherlands
{s.h.m.alers, j.hu}@tue.nl
Abstract. Designing intelligent products, systems and related services require the designers to be able to integrate technology in their designs. Among other skills, programming is the key for the designers to prototype and experiment with the intelligent behaviors. However most of the design students do not have inherent affinity towards programming and electronics. The AdMoVeo robotic platform is designed, purely for the purpose of teaching the industrial design students basic skills of programming. Moreover we aim at a platform that motivates and encourages the design students to explore their creativity with their passions in graphical and behavioral design. This paper presents the hardware and software design of the platform, and shares the experiences in using it in a programming course.
Keywords:creative programming, industrial design, robotic platform
1 Introduction
The discipline of Industrial Design is redefined at the Department of Industrial Design at Eindhoven University of Technology, following the needs from the creative industries of lifestyle, healthcare and wellbeing, preparing students for a new type of engineering discipline: design and creation of intelligent products, systems and related services [1]. These systems, products and services are required to be adapted to the user and thereby provide a new experience. To design and create these systems, products and services, the education must cover a broad area of technology, such as computer science, electronics and mechanics, not mentioning other areas of form giving, user centered design and business process. The aim of the education is to provide the students with capabilities to break the barriers among science, design and engineering [2] and integrate these disciplines in their designs.
As Hu et al [3] point out, the industrial design of intelligent products and systems is a contemporary challenge which deserves more attention and better support by methods and tools. Things becomes more complicated when intelligence is distributed over and embedded in the networked devices [4-6]. For a long time the worlds of embedded systems and industrial design developed separately. The early examples of embedded systems included products such as telephone exchanges, plant control, and military applications. The early examples of industrial design included furniture, radios, cars, and household tools. In other words: the embedded systems where invisible and their users were not given much room for affective or spontaneous behavior. In contrast, the industrial designers had to give priority to the emotional associations, the styling, the appeal, the usability and even the fun associated with the product. Now many everyday objects contain embedded systems and the two worlds are merging, but much work regarding their integration remains to be done.
Like many other design departments, we are facing the challenge of teaching the engineering principles and practices such as computer science and mathematical modeling to design students that are neither mathematicians nor computer scientists [7]. As a general framework we use a competency based learning model [1, 8] that focuses on complex behavior and gives equal weight to knowledge, skills and attitudes. The knowledge, skills and attitudes are integrated already during learning, instead of being done afterwards, when the student has become active as a professional. The integration requires a powerful and rich learning environment. The student has to learn how to develop contexts of use, how to actively explore concepts, how to evaluate alternative solutions, how to bring new artifacts into the world, in other words, how to design. This learning model appears not only to be well-accepted for traditional industrial design, where the material form of things is the central theme, but also to be effective for the aspects of industrial design that overlap with computer science [3, 7].
To be engaged in the integration of technology and design as early as possible in their studies, the students spend more than sixty percent of their time in design projects in which working prototypes are always required. An iterative and reflective process is always encouraged [9], in which several rapid prototypes for insights and reflections need to be developed quickly when they are needed. Creating these prototypes often needs skills in basic programming and electronics. And these skills should be mastered as early as possible in their studies.
Most of the students in our department do not have an inherent affinity towards programming and electronics. But they do have passion in visual designs and product behaviors. Traditional ways of teaching programming and electronics by lectures combined with exercises had been tried in our department, but the students found that it was hard for them to build the link between the theory and the practice. Design students are often eager to put the just learned knowledge into their practice, if not immediately, as quickly as possible. In their words, they would like to see immediately their creations “dance and sing”. Any longer delay in delivering the hands-on experience only builds up their frustrations and disappointments.
For this a 56 hour (over 7 weeks) course “CreaPro” (Creative programming for designers)[1] was created. In this intensive course, the programming language “Processing” is taught. “Processing is an open source programming language and environment for people who want to program images, animation, and interactions. It is used by students, artists, designers, researchers, and hobbyists for learning, prototyping, and production. It is created to teach fundamentals of computer programming within a visual context and to serve as a software sketchbook and professional production too”[2]. It evolved from ideas explored in the Aesthetics and Computation Group at the MIT Media Lab [10]. The language can be seen as a simplified version of Java. Actually the entire Processing environment is written in Java. Programs created in Processing are first wrapped up with referencing Java libraries and classes then translated almost directly into Java programs. Processing requires much lower entry level in understanding objects and classes than Java, hiding the complexity of Java libraries and configuration. It provides an easy-to-use but also rich graphics library without confusing the users with difficult concepts such as double-buffering. Using the graphics in the programming environment is easy and the user can easily see the visual behavior of the program. The large community of artists and designers behind Processing also gives the students the feeling of a good choice.
But our students are not only visual designers. They are educated to be industrial designers of products and systems. Processing alone is not enough to give them enough hands-on experience in designing product behavior. Additional tools are needed not only to bring their creations alive in the physical world, but also to bring their experiences into their design projects. A robotic platform, AdMoVeo[3], is designed especially for this purpose.
Next in this article, after the design requirements being explained, the detailed hardware and software design of AdMoVeo is presented, followed by examples of the student work during and after the course.
2 Requirements and design iterations
For several years we have been observing the design students in the need of knowledge about microcontrollers and programming in their projects. Although they have already learned Java and basic electronics, but the knowledge they had was too abstract and was not tangible enough in practice. We started exploring how we could get our design students more interested in deeper understanding the principles. Since most of the robotic platforms employ principles in both programming and embodied behavior, they seem to be ideal carriers to deliver the hands-on experience, and to be appealing enough to get the students motivated.
Taking into account the main goal of the CreaPro course, we started exploring possible candidates of robotic platforms, with clear requirements bearing in mind:
1. Easy integration with the programming language, by using the same language in programming the robots as standalone systems or by directly and easily controlling the robot from a computer, or if possible, both. This is essential because the major goal of the course is the programming language, not robotics or embedded systems. Students should not be engaged in a second language for programming the robots.
2. The main part of the platform – the microcontroller – should be detachable and should be reusable in future design projects for the students, so they can carry on the knowledge and the experience directly in their projects. This also implies that the dimension of the microcontroller should be small enough to be fit into products or prototypes of a variety of sizes.
3. Intelligent products and systems require sensors and actuators to interact with the environment. The students will be facing all sorts of intelligent products and systems and will be in need of all kinds of sensors and actuators when creating their designs. Hence the platform and the microcontroller should be versatile in connecting to and interfacing with different types of sensors and actuators, and more open ports for the connections are better.
4. The success of the Processing language is largely due to the community of artists and designers sharing experiences in using it. We would also like to seek a hardware platform that has a similar large community behind it, not only for students to learn from other designers, but also for them to share their design results with the community of their own.
5. Technology see-through and transparency are preferred. The design students are often afraid of wires, switches and electronic devices. Seeing through the platform would give them the intuitive view of the hardware components, and give them the feeling of everything being in order and in control. The transparency, on the other hand, should provide the student with a simplified abstraction of the technology, such that they don’t have to worry too much about voltage and current, and other fundamentals of the electronics, which are not the focus of the CreaPro course.
6. If possible, wireless communication between the platform and among the platforms is preferred, for in many cases the students need to prototype standalone or mobile products and the interaction among the products and other systems.
7. Last but not least, the cost of such a platform, including the microcontroller, should be affordable for the students.
There are several commercial robotic platforms or kits available in the market. Here we mention a few of them.
Lego Mindstorms[4] is found to be handy in robotic prototyping and in collection user requirements in designing more sophisticated robots and systems [11]. The advantages of Lego Mindstorms are large collections of mechanical parts including a variety of bricks, beams, joints and wheels, and a versatile programmable brick (RCX, and the newer NXT) that can be programmed in many different languages including C and Java. It has also a large community behind it, but people in this community are mostly children and hobbyists. As a tool to be used in a programming course, it also seems to be an expensive toy.
A lot of researchers and designers use Phidgets[5] for prototyping [12, 13]. Phidgets are mostly USB interfaces to sensors and actuators, controlled from a PC. It comes with API’s for many programming languages such as C, Java, Pascal and Max/MSP. However they are simply USB interface components for PC’s, which means usually a PC is required to control them and there is usually a wire tail behind them.
The Microchip PIC[6] also drew our attention due to its low cost, wide availability, large user base, extensive collection of application notes, and many low cost or free development tools. However it is hardly used by artists and designers because of its high threshold in understanding micro processors and programming embedded systems. But since it seems to be close to our requirements, our first prototype was built using a PIC, while looking for a better platform.
At the end it was our students who suggested Arduino[7]. In the same time period of our first prototype was being created, our master students discovered and started to use the Arduino platform into their projects as it turned out to be an easier platform to cope with due to the development environment and software libraries.
As stated on its homepage, “Arduino is an open-source electronics prototyping platform based on flexible, easy-to-use hardware and software. It's intended for artists, designers, hobbyists, and anyone interested in creating interactive objects or environments”. Numerous sensors and actuators can be connected to Arduino to sense and affect its environment [14]. The Arduino development environment is based on Processing, which is actually or preferable environment for teaching programming in CreaPro. Arduino applications can be both standalone or they can communicate with other Arduinos or with software running on a computer or even a mobile phone, either through a wired USB or serial connection, or through wireless connection using Bluetooth components or an XBee[8] module. The only unhandy feature for CreaPro is that the microcontroller must be programmed in so-called “Arduino programming language”, which is based on Wiring[9], a simplified version of C. Wiring to C is similar to Processing to Java. Although it looks very similar to the Processing language, as we stated in the requirements, we don’t want to engage the students in learning a second language in CreaPro, even if there is very little to learn. Hence additional care should be taken to hide the differences or to provide transparent access to Arduino from the Processing programs.
We went through three iterations to reach the design of AdMoVeo. The first prototype, PicBot (Fig. 1a), was built using PIC 18f4550 microcontroller, including the features such as prefab chassis, twin motor with gearbox, battery pack with integrated battery charger, motor driver circuit, and two switches as bump detection. After showing this platform to the students, the round shape was found to be appealing to them hence it was kept throughout the design process. The low-cost solution of two motors and their driving units was also found to be effective enough to be used in later iterations.
After the decision being made to switch to the Arduino platform, the second prototype, Arduinobot (Fig. 1b), was built using an Arduino Diecimila[10] board, featuring two separate geared DC motors, 4 rechargeable AA batteries, wireless xbee communication and 2 light sensors. All these features were kept for the final design of AdMoVeo. After running through numerous test runs and checking against the requirements of the CreaPro course, extra sensors were added and a professional design was made for the electronics and mechanics to improve the features of the prototype, which resulted in the final AdMoVeo design (Fig. 1c).
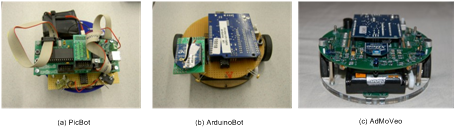
Fig. 1. Early prototypes of AdMoVeo
3 AdMoVeo
3.1 Hardware design
The final design of AdMoVeo features a detachable Arduino Diecimila board and two wheels integrated within the round shape of the chassis. The size of the chassis is increased from 10cm to 12cm in diameter, exactly the size of a CD. The chassis and motor mount are made from transparent acryl glass, giving it a see-through look into everything inside. The sensors include two line readers at the bottom, three infrared distance sensors at the sides and in the front with sensibility of 0 to 20cm, two light sensors in the front, two sound sensors at the sides and two optional encoders coupled to wheels. The actuators include two motors driving two wheels, a buzzer and a RGB color LED integrated into the acryl chassis. An XBee module is optional for wireless communication. Fig. 2 shows the 3d rendering of the AdMoVeo design and an exploded view of the internal structure.
The Arduino board is designed to be detachable, so that the students can take the Arduino boards with them after the course and further make use of them in their design projects. The platform will be offered by the faculty and reused in the next run of the course.
The hardware is also designed to be easily assembled by students themselves. Experience with soldering and wiring the components together gives the student a lot of confidence in handling the electronics, although many of them do not have in depth knowledge of electronics yet.
Extra attention was also paid to the layout of the components, so that modifications and extensions can be done easily. For more experienced students, they can detach the preconfigured sensors and actuators, and connect different ones for their applications, without paying too much of efforts.
Detailed lists of components, layout of the PCB and instructions for assembly are available at www.admoveo.nl.
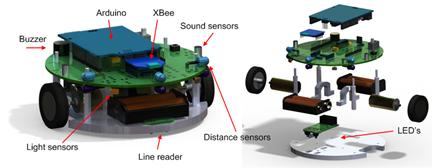
Fig. 2. 3D rendering of the design of AdMoVeo
3.2 Software design
Fig. 3 shows the object-oriented view of the software structure. The software design is based on a layered structure of composition and inheritance. It has mainly two major parts – the firmware IDuino running in the Arduino microcontroller of the AdMoVeo robot, and the Java API library for programming and controlling AdMoVeo in the Processing programming environment.
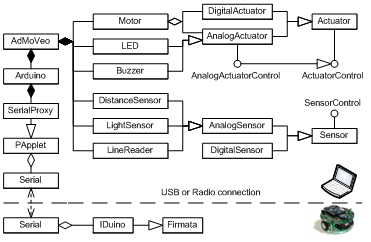
Fig. 3. AdMoVeo Software Design
The firmware IDuino is an implementation of Firmata[11], a generic protocol for communicating with microcontrollers from software on a host computer. At the host computer side, the Arduino object acts as a proxy to the IDuino firmware, hiding the communication details and providing transparent access to the digital and analog I/O pins of the Arduino board. The AdMoVeo class further wraps up the Arduino I/O details, providing transparent access to the sensors and actuators of the physical robot. Once the IDuino firmware is uploaded to the robot, the students only need to program the robot from the computer using the Processing language without leaving the Processing programming environment and touching any pieces of the Wiring code inside the Arduino microcontroller.
Programming the AdMoVeo robot follows the principles of object-orientation and event-driven programming. The following code shows an example of programming a simple behavior of AdMoVeo in Processing: When the left distance sensor detects a change, the callback function inputAvailable receives the message and schedules a task changeBlueLed for being executed as soon as possible (NOW). The task changeBlueLed then changes the color of the blue LED of the robot according to the distance detected.
//import library for serial communication
import processing.serial.*;
//import the AdMoVeo library
import nl.tue.id.creapro.admoveo.*;
//declare a reference to an AdMoveo robot
AdMoVeo admoveo;
void setup(){
//create an AdMoVeo object, setting up the serial communication
admoveo = new AdMoVeo(this, "COM5");
//enable the left distance sensor
admoveo.getLeftDistanceSensor().enable();
}
//react on the input events
void inputAvailable(Sensor sensor, int oldValue, int newValue){
if(sensor == admoveo.getLeftDistanceSensor()){
admoveo.execute("changeBlueLed", AdMoVeo.NOW);
}
}
//task to be executed.
void changeBlueLed(SensorStatus s){
//left distance sensor returns a value between 0 and 1023.
int power = s.get(admoveo.getLeftDistanceSensor())/4;
//the color for the blue LED is set accordingly
admoveo.getBlueLed().setPower(power);
}
4 Examples of Student Work
We have used the AdMoVeo robot during the CreaPro course for 140 first year industrial design students. The robot was introduced in the middle of the course, after the student were introduced to some basics of programming, such as control flows, functions, arrays and loops as well as minimal knowledge of object orientation. Before the robot was introduced the exercises were mainly focused on graphical applications but after that the exercises also included robotic assignments. No lectures were given about the Robot except some briefing about installation of the firmware and libraries, meanwhile the course went on with other topics such as algorithms and graphical user interfaces. The students were asked to read the documentation to learn the API’s on their own. They were challenged to deliver a demonstration to show what they have learned from the assignment, and to show their capabilities of reading and understanding the documentations, and to show their creativities as much as they can. The strategy of combining the graphical power of the Processing language and the hands-on experience with microcontrollers in the CreaPro course turns out to be a success. The feedback from the students was in general very positive. The AdMoVeo did have positive impact on their learning experience and many found the AdMoVeo to be “a lot of fun to play with”. We as teachers were also supersized and amazed by the robotic behaviors created by these first years.
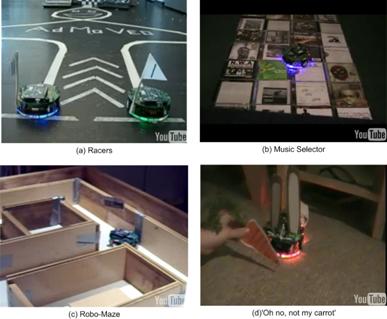
Fig. 4. AdMoVeo behaviors by first year students
In Fig. 4a are two racers created by Tom Koppenol, Marieke de Rooy and Thomas Westelaken. The robots uses two line readers to follow the line indicated using painting tapes on the floor. The tracks have curves and crossing which are quite challenging especially when the robot is running at a speed. Fig. 4b shows the music selector created by Tim Ebbers and Chris Gruijters which uses the line reader for a different purpose – to find which CD box is underneath the robot. Once found, the message is send to the computer and the computer plays back the corresponding album. The AdMoVeo in Robo-Maze (Fig. 4c) by E C Vos, J L Adriaanse and S Wouw can escape from the maze by using its distance and light sensors to detect the walls. Jaap van der Schaaf, Julie Hornix and Diane Bouten transformed the AdMoVeo ino a rabbit that is sensitive to the distance of the carrot, always trying hard to follow it. The still pictures in Fig. 4 can hardly show the dynamic behavior of these robots and the happy faces of the students. To see these robots, as well as many others, visit YouTube and search for “AdMoVeo” and “CreaPro”.
The creativity of the students goes further with the experiences with the Arduino platform. The strategy of a detachable microcontroller encourages the students further explore the possibilities and the opportunities brought forward by the integration of technology and design. The arduino platform is now widely used in student projects, many of which have resulted in impressive designs. Limited by the space in this paper it is impossible to show all of them, instead we include only two examples shown in Fig. 5. The TV remote in Joris van Gelder's hands turns into a magic interaction device instead of a boring one, giving the interaction a aesthetic touch with dynamic movements and lighting (Fig. 5a). Ennea (Fig. 6a), which is Greek for nine and symbolizes a turning motion, is the result of our six-week design project by five stuents. Ennea records real-life data by looking at social contact and interaction between pupils within a school environment. This is done with mobile-networked objects, which can be carried around by the pupils. These interactive objects provide a platform to reflect upon real-life social data through exercises and to create a new way of interaction between pupils to stimulate social contact.

Fig. 5. More designs created using the Arduino platform
5 Concluding remarks
The AdMoVeo robotic platform is designed purely for the purpose of teaching the industrial design students basic skills of programming. Moreover we aim at a platform that motivates and encourages the design students to explore their creativity with their passions in graphical and behavioral design, which in turn gives them spontaneous and intrinsic drive in learning programming. In the design of AdMoVeo, the transparency provided by the software structure enables the student focusing on the programming aspects, and at the same time quickly being engaged in hands-on experience with embedded behaviors; the separation of the Arduino board from the robotic platform invites the students further apply and further develop the learned knowledge in their design projects.
We would also like to mention that the AdMoVeo platform and the software mentioned in this article are all open source, available for sharing and further development at www.admoveo.nl and wiki.id.tue.nl/creapro.
Acknowledgements
The authors would like to thank Chet Bangaru for his support on mechanics and 3D modeling, Geert van den Boomen and Peter Peters for their help on electronic devices, Caroline Hummels for her understanding and support, the CreaPro team for working out this fantastic course together, and the /d.search labs for prototyping facilities.
References
1. Feijs, L., Kyffin, S.: The new Industrial Design Program and Faculty in Eindhoven-Competence based learning and designed intelligence. Proceedings of the Designing Designers (2003)
2. Bartneck, C., Rauterberg, M.: HCI reality-an 'Unreal Tournament'? Int. J. Hum.-Comput. Stud. 65 (2007) 737-743
3. Hu, J., Ross, P., Feijs, L., Qian, Y.: UML in Action: Integrating Formal Methods in Industrial Design Education. Lecture Notes in Computer Science 4469 (2007) 489
4. Hu, J.: Design of a Distributed Architecture for Enriching Media Experience in Home Theaters (PhD Thesis). Department of Industrial Design, Eindhoven University of Technology, Eindhoven (2006)
5. Hu, J., Feijs, L.: IPML: Structuring distributed multimedia presentations in Ambient Intelligent Environments. International Journal of Cognitive Informatics & Natural Intelligence (IJCiNi) 3 (2009) 37-60
6. Hu, J., Feijs, L.M.G.: An Agent-based Architecture for Distributed Interfaces and Timed Media in a Storytelling Application. The 2nd International Joint Conference on Autonomous Agents and Multiagent Systems (AAMAS-03) (2003) 1012-1013
7. van der Vlist, B., van de Westelaken, R., Bartneck, C., Hu, J., Ahn, R., Barakova, E., Delbressine, F., Feijs, L.: Teaching Machine Learning to Design Students. Technologies for E-Learning and Digital Entertainment (2008) 206-217
8. Voorhees, R.: Measuring what matters: Competency-based learning models in higher education. Jossey-Bass (2001)
9. Hummels, C., Frens, J.: Designing for the unknown: A design process for the future generation of highly interactive systems and products. Internation Conference on Engineering and Product Design Education, Universitat Politecnica de Catalunya, Barcelona, Spain (2008) 1-6
10. Reas, C., Fry, B.: Processing: a programming handbook for visual designers and artists. Mit Press (2007)
11. Bartneck, C., Hu, J.: Rapid prototyping for interactive robots. In: Groen, F., Amato, N., Bonarini, A. (eds.): Intelligent Autonomous Systems 8. IOS Press, Amsterdam (2004) 136-145
12. Greenberg, S., Fitchett, C.: Phidgets: easy development of physical interfaces through physical widgets. ACM New York, NY, USA (2001) 209-218
13. Peters, P., Feijs, L., Oei, G.: Plug and Play Architectures for Rapid Development of Medical Simulation manikins. The 12th World Multi-Conference on Systemics, Cybernetics and Informatics: WMSCI 2008, Vol. II, Orlando, Florida, USA (2008) 214-219
14. Igoe, T.: Making things talk: Practical methods for connecting physical objects. Make Books (2007)
[1] http://wiki.id.tue.nl/creapro
[2] http://www.processing.org
[3] http://www.admoveo.nl
[4] http://mindstorms.lego.com
[5] http://www.phidgets.com
[6] http://www.microchip.com
[7] http://www.arduino.cc
[8] http://www.digi.com
[9] http://wiring.org.co
[10] http://arduino.cc/en/Main/ArduinoBoardDiecimila
[11] http://firmata.org
